A $90 DIY Weather Station with Air Quality Monitoring
Having accurate local Air Quality information can help you make decisions about whether to open your home's windows or weather you should wear a mask when going outdoors. This weather station will report that and much more to an MQTT broker of your choice.
About a month ago, I built a weather station to put on my front porch (where all the good shade lives). I hadn’t done a write-up yet, but since this weather station includes a Particulate Matter sensor and we live in these times where suddenly Air Quality is important for quite a lot of people who didn’t need to notice it previously, I’m doing that write-up now.
This weather station captures the following metrics:
- Temperature
- Atmospheric Pressure
- Relative Humidity
- VOC (note that this is mostly useless unless running the board in Arduino mode, for which no code is supplied)
- Particulate Matter (PM1.0, PM2.5, PM10, Particles per 0.1L air at < 0.3, <0.5, <5.0, and <10.0 microns particle size)
The Hardware
I can’t guarantee that these parts will be available forever – if this article is old, you may find you need to substitute some parts. Listed prices are USD.
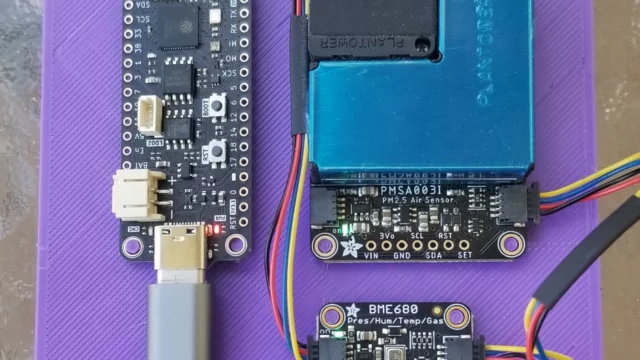
- Feather S3 by Unexpected Maker – $22
- PMSA003i PM sensor with STEMMA QT I2C Connector – $45
- BME680 sensor with STEMMA QT I2C Connector – $19
- 2 x STEMMA QT cables – $1 each
- Enclosure – custom enclosure STL files are available in the Gitlab repo for this project (see link in next section), or you can make your own any way you like. It needs to be ventilated, shaded, and protected from precipitation.
- USB-C cable – for programming the Feather S3, a cable capable of data transfer is needed. Once programmed, a power-only cable is sufficient.
- Optional: a LiPo battery. The Feather S3 board has on-board battery management and a connector. A battery will enable you to move the station without it losing power, and will allow it to survive short power outages without restarting. A large enough battery will allow it to be placed in otherwise un-powered locations, possibly with solar panel support.
- Optional: a graphical display. This could be in the form of a FeatherWing, a separate board with a STEMMA QT connector, or a board with basic GPIO pins requiring a custom connection. The enclosure does not support a graphical display as-is, and you will need to write in the code to connect to and display the data on the display.
The Project
For the complete code that is running on my weather station, please visit my Weather Station Gitlab Repository. Because not everyone will want to use MQTT as the data transport mechanism, I will also provide some resources below to help you modify the code to fit your needs.
Secrets
This script comes with a file named secrets-example.py. You should edit this file to include the relevant secrets (at minimum you’re likely going to need wifi credentials) and save it as secrets.py. You can also add additional secrets to the file to meet your needs.
External Libraries
This script makes use of some CircuitPython libraries that are not part of CircuitPython’s core. You’ll need to grab a copy of the CircuitPython bundle that matches your board’s CircuitPython version. The easiest way to confirm your board’s CircuitPython version is to connect to the board’s serial console and enter the REPL. The version will be printed in the welcome line.
If you’re not sure how to connect to the serial console, check Connecting to the Serial Console in the Adafruit Learning Portal’s Welcome to CircuitPython tutorial.
The libraries you will need are:
- adafruit_bme680
- adafruit_minimqtt
- adafruit_pm25
These libraries should be copied into the lib directory on the board’s USB drive. If there’s no lib directory, make one at the top level. Some libraries have their own directory, while others are single .mpy files.
MQTT
If you want to use the code as-is, you will need an MQTT broker. You can run your own MQTT broker service or subscribe to an already-established service – which one you choose is beyond the scope of this article.
Once you have MQTT and WiFi credentials, enter them into secrets.py and you should be good to run the script.
What do I do with the Data?
Once the data from my weather station reaches my MQTT broker, I pull it into OpenHAB and display it in a weather dashboard along with data pulled from a weather API. I also poll the temperature data using a Huginn agent for other Huginn agents to act on depending on the temperature value (sends Pushover notifications when the temperature crosses freezing/not freezing and open-the-windows/close-the-windows thresholds).
Data Transport Alternatives
In the event that you do not want to use MQTT as your data transport mechanism, here are a few alternatives.
- http api – serve up individual datapoints in JSON via http using the CircuitPython http server
- prometheus – serve up all datapoints on one plaintext document via http using Prometheus Express (NB: the last meaningful update to that repository was made about 3 years prior to this article’s publication date)
- Direct to connected display – make this a completely portable solution by adding a LiPo battery and a display for on-the-go air quality information. Put it in an enclosure so you don’t damage the electronics or scare the normies. Add some buttons and button-press handling code to allow rotating through the different datapoints. Readings can be logged to a file on the board’s USB drive as long as it’s not mounted to a computer. Or, add an I2C SD card board and log your data there.
- Using the on-board RGB LED – add in AQI calculation (see next section) and use the Feather S3’s on-board RGB LED to communicate the AQI by official color for an extremely low-res visual indication
Calculating the Air Quality Index
The weatherstation.py script does not currently calculate the Air Quality Index, but I do have an AQI calculation script for the PMSA003i that I originally wrote for the MagTag, which could be adapted and incorporated into weatherstation.py. I wrote this script using the EPA’s Technical Assistance Document for the Reporting of Daily Air Quality – The Air Quality Index (AQI) resource. This document details how the US Air Quality Index (used, for example, by AirNow.gov) is calculated.
You may alternately choose to use Patrick Ferraz’s airquality Python library, which does the same thing but encloses the calculations within a library function and can handle calculations for more pollutants than PM2.5 and PM10.0.
If you’re using MQTT, you could easily run a separate Python script on a separate machine to calculate the AQI using your local readings and report them back over to your MQTT broker.
What About Indoor Air Quality?
You could choose to run this weather station indoors, but if your home’s air filtration is up to par, the PMSA003i will yield extremely low readings and probably won’t be worthwhile. A more useful sensor for an indoor air quality monitor is one that reads CO2 concentration. CO2 concentration is commonly used to determine whether an indoor space’s ventilation is adequate.
- NIST’s Indoor CO2 Tool Can Help Assess Ventilation and Indoor Air Quality
- Exhaled CO2 as a COVID-19 Infection Risk Proxy for Different Indoor Environments and Activities
- DIY-ing My Way to Better Ventilation
Conclusion
Manufactured outdoor weather stations usually don’t include a particulate matter sensor. PM sensors can be purchased as add-on modules for some systems. Chances are good that you’ll spend several hundred dollars on such solutions. If you’re DIY-inclined, this weather station may be a good low-cost alternative.
If you find an error in this article or within the linked Gitlab repository, please let me know by submitting a comment here or you may contact me via ActivityPub.